Thursday, October 9, 2014

Maximize Your Kitchen Space

"counter space!" by Maggie Hoffman is
licensed under CC BY 2.0
Regardless of the size of your apartment’s kitchen, it seems like there is never enough space for cooking, not to mention storage. If you are especially pressed for space to cook, storing your kitchen utensils in an organized and efficient way is paramount. Get creative with maximizing the space in your kitchen with these storage ideas from The Kitchn:


Add shelving anywhere you can: When space is at a minimum, you have to make the most of whatever you can find. That will likely mean adding shelving or a hanging cabinet to spaces that might otherwise go unused. Just make sure you have stylish storage containers if you opt for open shelving.


Hang your pots and pans: By storing your pots and pans vertically, you’ll free up cabinet, shelf, and drawer space for more pantry storage. We’d much rather see a beautiful Calphalon or All-Clad pan than a box of cereal or a bag of chips.


Make use of your cabinet doors: The inside of your cabinet doors are a woefully underused resource. Use them for storing spices or small kitchen utensils to free up even more space for larger items.


Put even narrow spaces to use: Think an awesome skinny storage rack is out of your reach? Think again! Find out how you can easily DIY a rolling pantry that is designed to fit whatever space your kitchen has to offer.


Organize in tiers: A simple and inexpensive addition, risers in your cabinets will not only make use of the vertical space on your shelves, but they’ll help you know what you already have and avoid buying duplicates.


Add a cart: If you have more space near your oven than you do in your pantry, keep a rolling cart with all your essential items at hand. You can move it around to wherever you’re cooking or stash it away when you have guests over and need more floor space.


Don’t forget about the space under your cabinets: Steal a trick from woodworking workshops, and affix lids to the bottom of your cabinets to keep jars of your most used items handy. Just be sure your cabinet is sturdy enough to hold the jars when they are full.
How do you make the most of the space in your kitchen? Share your tips with us!

Thursday, October 2, 2014

5 Things to Know About Living Alone

"166" by Mitya Ku is licensed under CC BY-SA 2.0
For many people, living alone is best for all involved. If you're not home a lot or just like to have your space and things arranged your way, living alone is probably ideal. As with any living situation though, living alone comes with its pros and cons. Here are some common issues faced by those who live alone and some solutions on how to cope, courtesy of Apartment Therapy. 

1. ECONOMIES OF SCALE
Problem: Generally, the more you buy at one time, the cheaper it becomes. While a family of six cruises through a pot of chili, that much food can get wasted in a household of one. It's also more expensive to buy smaller quantities of toilet paper and other household supplies.

Solution: The Kitchn has some great tips for cooking on your own. For everything else, consider teaming up with a friend, family member, or neighbor to split that 24-pack of toilet paper. You’ll save money and space in the process.


2. HEAVY OBJECTS

Problem: You get an itch to decorate first thing on Saturday morning and find yourself stymied by your grandmother’s huge, six ton armoire.

Solution: Don’t hurt yourself by trying to lift things yourself. First, break the piece down in any way to make it manageable: empty contents, remove drawers or legs. If it's still too big or heavy, round up a friend or next-door neighbor to help you out on the fly. Otherwise, save up all your little odd jobs and hire someone one Saturday afternoon to knock out everything out on your to-do list that requires help.


3. LONELINESS AND BOREDOM

Problem: Even if you have tons of friends, a boyfriend/girlfriend, sometimes being home alone at night is a downer. Everyone likes someone to turn to to express outrage over Ann Coulter’s most recent comment, or to rub it in when you get that night's Final Jeopardy question correct.

Solution: Create structured ways to leave the house and regularly interact with others— especially if you also work at home — at the times you feel most alone. Sign up for yoga classes, or join a book club. Host regular dinner parties, or even low-key television watching sessions with another person who shares your love of Mad Men. Lastly, think about adopting a furry friend. (Because everyone talks to their pets, no matter what we tell others.)


4. FEAR FOR SAFETY OR WELL-BEING

Problem: Maybe you are scared of axe murderers at night. Or, you worry about falling down the stairs and having no one find you for days. These are very rare yet valid concerns that shouldn't be deal breakers.

Solution: Yes, there’s always LifeAlert. And the pet (dog) you adopted to thwart loneliness will also help deter any meanies. Otherwise, set up a check-in system with a friend/neighbor and agree to touch base with each other regularly via text or phone. Ideally, this person will live alone as well, so the benefits go both ways. If one party is suspiciously quiet, either expect a welcome knock on your door, or head on over to check out your buddy.


5. DELIVERIES AND REPAIRS

Problem: You're only one person, and can only be so many places at one time. If you expect a package during the day, or need something repaired, there are only so many times you can take off work to be there in the flesh. There's no one right answer for this problem: the solution depends on your unique situation and needs.

Solution: For mail, check out this post on How to Manage Home Deliveries. For repairs, arrange to work from home one afternoon (again, if this is feasible). Renters can often ask landlords to greet the person on site. If you know and completely trust your repairman or contractor, install a key safe outdoors, then change the combination once the work is done. If all else fails, and you have to take the time, try scheduling appointments first thing in the morning, or as the last slot in the day.


Do you live alone? What to you do to combat these common problems? Share your advice below!

Friday, September 26, 2014

Plan a Budget-Friendly Weekend

"Piggy Bank on Top of a Pile of One Dollar Bills" by Ken Teegardin is licensed
under CC BY-SA 2.0
Maybe the pay at your job isn’t the greatest or you’re saving up for something special, but regardless of your current financial situation, we all have to cut back from time-to-time. Imagine a weekend where not only do you not spend money, but you also feel like you had a full, productive weekend, too. It is possible! Apartment Therapy offers these six tips for planning a zero-spend weekend.


1. Plan what the rules to a money-free weekend are for you
Some people go extreme — no spending money means not evening turning the air conditioning or lights on. Others just pledge to cut down on frivolous spending. Others really try not to swipe their credit card the whole weekend. You know your needs and your family needs — so make up the rules that might be a little challenging for you but still doable.


2. Tell your friends and family
Yes, telling friends and family about your money-free weekend plans can help keep you accountable, but it might also help take temptation off the table — they might not invite you to the newest brunch spot or be more open to joining you on a free activity to help you keep your goal.


3. Use the weekend to work on home
If you've taken our advice about making lists and buying supplies as you go...this might be a perfect time to work on an item that needs repair or a DIY project you've been wanting to tackle. But it's also a great time to clean, straighten up or tackle an organizing job that won't take any money spending to accomplish!


4. Cultivate your list of money-free activities
Free arts shows in your community. A visit to the local library. A walk around a park with a good podcast. There are a number of free things to do, and a great place to start is to consider your favorite hobbies — and how you can tackle them without spending a dime. Love cooking? Give yourself a challenge to create a meal out of only what you can find in your fridge and pantry. Love photography? Walking around and shooting interesting things is free. Make a list this weekend to keep on hand so you don't reinvent the wheel every time you want to not spend a dime.


5. Give yourself a reward or remember a financial goal
If spending is a challenge, promise yourself a reward at the end of this money-free experiment (might work best if the reward doesn't cost money, though). Or, write down a financial goal before you start you can refer back to it when you get the itch to buy something.


6. Give it a try before deciding it's not for you
Not spending a dime for an entire weekend might be too weird of a concept — or for some impossible. But if you can, give it a go. It might give you the distance to see any unhealthy buying habits you might have and make financial changes for the better!

Thursday, September 18, 2014

Furniture Arranging 101

Have you ever arranged a room (and strained your back) to find that something about it just doesn’t flow? If you want to make a change in the feel of a room or want to switch things up for the current season, moving furniture around is a completely free way to do so. Consider these tips from Apartment Therapy as you rearrange your space.

Dining Room:

• Distance between the walls and the dining room table: Ideally, provide at least 36″ between the dining table and any walls or other furniture on all sides to allow seats to slide out easily.

• Distance between a dining table and an entrance: Provide around 48″ between the table and an entrance to allow people to enter and exit the room with ease.

• Vertical space between a dining chair and dining table: Chairs and chair arms should be able to slide under the table with ease. Leave about 7″ between the chair arm and apron of the table.

• Distance between chandelier and dining table: This is one of the more flexible topics. Low hanging lighting sets a more modern tone, but even so, it should never interfere with the ability to make conversation— no need to duck your face down to the table just to see your dinner guests. However, a light hung too high will detract from the cohesive feel of a room as well. A good rule is to hang lighting between 24″-32″ from the table.

• Area rug and dining table: A rug should span about 36″ wider on all sides of a dining table to allow chairs to pull out easily without catching.

• Space between dining chairs: Ideally provide about 24″ between chairs to prevent hitting elbows and to allow people to slide chairs in and out without any collisions or bruised knuckles.

"Living Room Updates" by Emily May is licensed under CC BY 2.0
Living Room:

• Distance between a sofa and coffee table: Allow around 18″ between the table and sofa edge to give enough leg room but to be able to set down drinks or reach appetizers without straining. Coffee table heights vary greatly, but a good rule is to keep the table height and seat height within 4 inches of each other.

• Distance between seating furniture: Aim to provide between 3.5′ and 10′ between seating options to help conversation flow without crowding a room.

• Side table and sofa height: In general, an end table should be approximately the same height as the arm of your sofa or chair. This allows guests to set down or reach for drinks without straining, and it also lends a more cohesive feel to the room.

• Distance between tv and sofa: There should be about 7′ between the tv and seating options.

• Area rugs and furniture: Too often area rugs end up feeling like bath mats. To keep your area rug from feeling random, at least the front two legs of a sofa or chair should rest on the rug.

• Distance between room-size rugs to walls: Allow about 24″ between the wall and room-size rug in a large room, and between 12″- 18″ in a smaller room.

Wednesday, September 10, 2014

Tailgate Tips

"Grilled Apple Sausage" by H. Michael Karshis is licensed under CC BY 2.0
Fall is in the air, which means one thing...football season is back! Are you ready? There’s no better way to spend pre-game time than tailgating. Follow these tips, courtesy of Apartment Therapy, to ensure that you are properly prepared for the perfect tailgate.  


1. Research the tailgating site: Even before you get to the packing and prepping of food, make sure you know where you can park, what the facilities are like, and what the rules are. Are open flames allowed so that you can grill? Is there running water, bathroom facilities, or rules about alcohol? What time can get there, and how late can you stay?


Think about the weather and the time of day when planning — will it be hot or rainy and a tent would be useful? And make sure you give yourself plenty of time to get there and set up.


2. Pack in, pack out: Unless a tailgate site explicitly says so, assume that everything you bring in comes home with you, including trash. Make sure you have plenty of heavy-duty trash bags, figure out how you'll handle recycling and packaging leftover food, and think about how you'll pack and bring home a dirty grill.


3. Multiple coolers are a must: Two coolers are the minimum — one for food and one for drinks. If you have a third for the raw food that needs to be cooked, even better! Make sure foods are wrapped tightly to prevent leaking and cross-contamination, and pack the things you'll need immediately at the top.


Label your drink coolers and tie a bottle opener to the handle so it's convenient and never gets lost. Make sure you have enough ice for drinks and to keep everything cold until you get home.


4. Grill prep: Make sure your grill is clean and that you have the necessary grill tools, enough fuel to last through all the grilling, and a portable fire extinguisher just in case.


5. Food choices: Have ready-to-go finger foods and snacks that you can put out immediately to keep people happy while the grill gets fired up. Keep more substantial food items simple and easy-to-serve. Bonus points if you don't even need plates to eat them off of, like kabobs and quesadillas! If you plan on tailgating after the game too, pack some different snacks and foods to grill then so that you have some variety.


6. Food prep: Do as much as you can at home, including marinating, cutting up vegetables, threading things onto skewers, or forming burger patties. Mix up big batches of drinks or cocktails so all you have to do is pour.


7. Equipment: Pack a few folding or portable chairs and tables. A tablecloth looks nice and makes for easier cleanup, and a few big stackable plastic bins can serve as trash and recycling bins. Don't forget a cutting board, sharp knife, and serving platters. Foil can help scrape down a dirty grill, keep food warm, or wrap up leftovers.


8. Water, water, water: Freeze some water bottles to both keep the coolers cold and so you'll have something icy to drink if it's a hot day. Bring along a big water container with a dispenser for handwashing too.

What are your tailgating must-haves? Share them with us below!

Friday, September 5, 2014

Make a Bold Decor Move

Photo courtesy Wicker Paradise
We have all seen something on Pinterest that we thought would look so cool, but then said, “I could never do that.” Yes, you can! Aside from things that you may have to ask your landlord for permission for, there are still many things you can do to take risks as you decorate--from furniture, to rugs, to accessories. So here’s that motivation you need to actually put those Pinterest boards to use, courtesy of Apartment Therapy.


1. Decide to do it — This is both the easiest and hardest part. You've thought it through, debated endlessly and now it's time for a simple yes or no. It's liberating! No more, "Gee, I'd really like to have..." or "Someday I'll try a..." That day is today! Don't dawdle, say yes and don't look back.


2. Get inspired — Time for the eye candy. You have a general plan, sure, but browsing some great inspirational images will help you really nail down what you love and what turns your stomach (and with risky decisions, it's usually one or the other). This is also when you'll start to get really excited about your project, which will further cement your decision to do it. Remember: this is fun!


3. Tell everyone — Now that you've made your decision, it's time to share. Telling everyone your plan is an insurance policy that you'll actually follow through. You're accountable, see? Sure, people will have their own opinions (and may decide to share them, unsolicited) but that won't bother you because you're solid in your knowledge that you've made the right decision for you.


4. Baby steps — Don't get overwhelmed and derail your decision. No matter how big or small, breaking down your project into baby steps will help you see a clear, do-able path to the finish line. It may be scary to paint a wall pink, but it's not scary to drive to the paint store — you can do that. It's not scary to grab some paint samples, piece of cake! Now, wash your wall, no problem. Baby steps are everything.


5. Repeat after me: nothing is permanent — There's nothing you can do to your home that you can't undo; it's as simple as that. Don't overthink this. If you don't like it, you'll try something else. Yep, you've spent some time and money to learn what you don't like (a very valuable lesson by the way) and next time you'll do better. The journey to your perfect home is never-ending and that is part of the fun, so don't be afraid to make a mistake once in a while.

Friday, August 29, 2014

Labor Day Cookout Menu

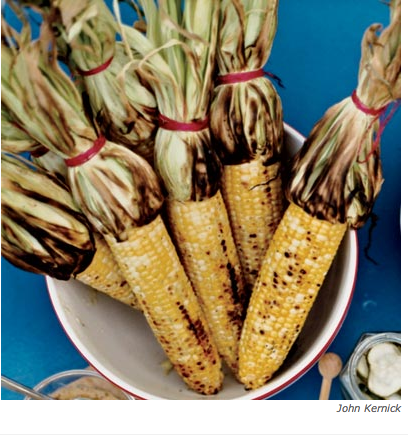
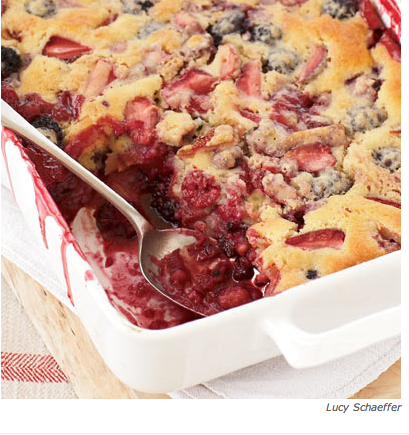
Alas, it is the unofficial end of summer...so why not go out with bang and invite your friends and family over for a cookout? Whether you are hosting or attending one, these recipes from Delish are sure to be the talk of the gathering! On the menu is mango peach sangria, grilled corn with mango-habanero butter, Mo’s sticky ribs and mixed-berry spoon cake. Visit Delish for some other recommended Labor Day cookout recipes.

Mango Peach Sangria
1/3 cup(s) sugar
1/3 cup(s) water
1 cup(s) Grand Marnier
1 bottle(s) Viognier
1 mango, chopped
2 peaches, cut into thin wedges
1/4 cup(s) mint

In a saucepan, cook the sugar and water until the sugar dissolves; transfer to a pitcher and refrigerate until cold. Stir in the Grand Marnier, Viognier, mango, peaches, and mint and serve over ice.


Grilled Corn with Mango-Habanero Butter
1 mango, peeled and coarsely chopped
1/4 cup(s) mango nectar
1 tablespoon(s) honey
1/2 habanero chile, seeded
1 1/2 stick(s) unsalted butter, softened
2 tablespoon(s) packed cilantro leaves, chopped
1/2 teaspoon(s) kosher salt
8 ear(s) corn

In a small saucepan, combine the chopped mango with the mango nectar, honey, and habanero chile. Bring to a simmer and cook over moderate heat, stirring occasionally, until the mango is very soft, about 10 minutes. Transfer to a food processor and puree until smooth. Strain the mango puree into a small bowl and let cool, about 30 minutes.

Wipe out the food processor. Add the cooled mango puree along with the butter, cilantro leaves, and salt and puree until smooth. Scrape the mango butter into a small bowl, cover and refrigerate until chilled, about 30 minutes.

Light a grill or preheat a grill pan. Pull the corn husks down to the base of the stalks, leaving the husks attached. Discard the corn silk. Using butcher string, tie back the husks. Fill a large bowl with cold, salted water and submerge the corn for 10 minutes.

Drain the corn but don't pat dry. Grill the corn over moderate heat, turning occasionally, until tender and browned in spots, about 8 minutes. Transfer the corn to plates, spread with the mango-habanero butter, and serve.


Mo's Sticky Ribs
2 1/4 pound(s) baby back ribs
Salt and freshly ground pepper
Granulated garlic, for sprinkling
Extra-virgin olive oil, for drizzling
1 tablespoon(s) whole cloves
1 12-ounce bottle of lager
1 cup(s) ketchup
1 cup(s) peach or apricot jam
3 tablespoon(s) fresh lemon juice

Preheat the oven to 300 degrees. On a rimmed baking sheet, season the ribs with salt, pepper, and garlic. Drizzle with oil and scatter the cloves over the ribs and in the pan. Pour the beer over the ribs, cover with foil, and bake for 2 hours, until the meat is tender.

Strain the pan juices into a saucepan. Whisk in the ketchup, jam, and lemon juice and boil over high heat until reduced to 1 1/2 cups, about 20 minutes.

Preheat the broiler. Set the ribs meaty side down on the baking sheet, brush with glaze, and broil 4 inches from the heat for 7 minutes. Turn the ribs and brush with half of the remaining glaze. Broil for 10 minutes, until starting to char. Brush with the remaining glaze and broil until browned, 10 minutes. Let rest for 10 minutes and serve.

Mixed-Berry Spoon Cake
4 pint(s) strawberries (2 pounds), hulled and quartered
2 pint(s) blackberries (12 ounces)
2 pint(s) raspberries (12 ounces)
3/4 cup(s) sugar, for the filling
2 tablespoon(s) cornstarch
1 1/2 cup(s) all-purpose flour
1 cup(s) sugar, for the batter
2 teaspoon(s) finely grated lemon zest
1 1/2 teaspoon(s) baking powder
1 teaspoon(s) kosher salt
2 eggs
1/2 cup(s) milk
1 teaspoon(s) pure vanilla extract
1 1/2 stick(s) unsalted butter, melted

Make the filling: In a bowl, toss the berries with the sugar and cornstarch and let stand for 10 minutes.

Meanwhile, make the batter: Preheat the oven to 375°. In a medium bowl, whisk the flour with the sugar, lemon zest, baking powder, and salt. In a small bowl, whisk the eggs with the milk and vanilla. Whisk the liquid into the dry ingredients until evenly moistened, then whisk in the melted butter until smooth.

Spread the filling in a 9-by-13-inch baking dish. Spoon the batter on top, leaving small gaps. Bake in the center of the oven for 1 hour, until the fruit is bubbling and a toothpick inserted into the topping comes out clean. Let cool for 1 hour before serving.

Did you try any of these recipes? Let us know or share your pictures in the comments!
Twitter Delicious Facebook Digg Stumbleupon Favorites More